Wednesday, March 28, 2012
It's Tutorial Tuesday on Wednesday! Make a felt chick for Easter!
This adorable tutorial comes to us from Myrtle & Eunice! Her tutorial calls for craft felt, but of course you can use recycled sweater felt! You can go directly to the tutorial & pattern here, but I recommend stopping by Tania's blog, Myrtle & Eunice, first to see more humorous pictures of her chicks, read her fun post, and see what other gems are on her blog!
Tuesday, March 20, 2012
It's Tutorial Tuesday! No sew recycled wool projects!
I am always saying that pretty much anything you can make with fleece or craft felt, you can make with recycled wool (felted sweaters), and these 2 no-sew projects are no exception!
This first one, is a method of joining squares with slits in them. Click here to go to the original tutorial on the How About Orange blog.
craft felt, from How About Orange:
With this, you can make trivets, a table runner... maybe even a blanket! I tried it out with some felted merino, and it worked great.
recycled wool, Resweater:
The next one is a no sew blanket edging.
fleece, from Nebraska Views:
This tutorial is for fleece, but of course I used recycled wool :). Click here to go to the original tutorial on the Nebraska Views blog.
recycled wool, Resweater:
Wednesday, March 14, 2012
It's Tutorial Tuesday! Make an adorable Easter finger puppet!
I found this tutorial from Molly at The Purl Bee. Aren't they just too cute?! While her tutorial calls for craft felt, I used recycled wool felt (felted wool sweaters). If you use recycled wool, I found that merino sweaters worked best for this project, but any thin to medium thickness felted wool should do. The turquoise one is felted cashmere. The only change I made, was that the tutorial called for yarn, to make a pom pom tail, but I didn't have any on hand. I just made 2 circles with pinking shears, and sewed that on instead. I like it just as much.
To go to the tutorial on The Purl Bee, just click here!
Photo from the Purl Bee:
Warning: these are addictive to make, and you may set out to make one, but end up with 2... or 3... or 4....
They are so cute, and so fun to make! I plan to leave them out with our wool eggs, so the Easter Bunny can put treats in them.
My son requested an orange & red one...
...but this little fair isle guy is my favorite!
Well... what are you waiting for? Get hopping! Easter is right around the corner! :)
Wednesday, March 7, 2012
It's What I've Been Working on Wednesday
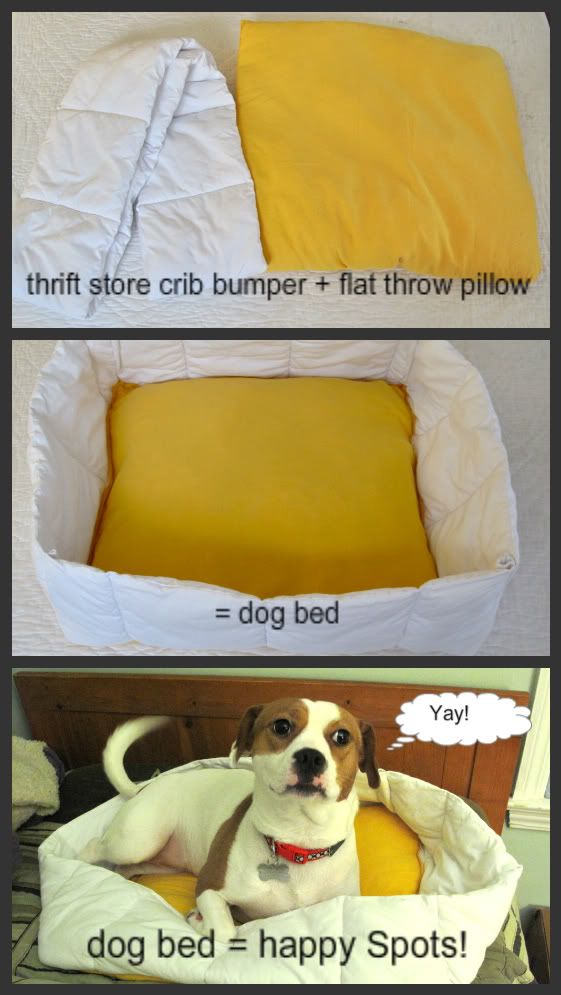
That quilt I blogged about yesterday took up most of my week's sewing time, but I managed to get sidetracked and make a couple of other things. I hate most store bought dog beds. They fall apart if you look at them cross eyed, and they always seem to be made from something synthetic & uncomfortable looking. When I found a crib bumper at the thrift store for around 50 cents, I knew exactly what I wanted to do.
Spots loves a good "nest" (she'll paw at a blanket to create a nest, unless she has a dog bed with sides). She was very happy with her new nest!
It took me less than 5 minutes to sew the bumper to the pillow, the whole thing cost under $1 in materials, and is sturdier than any dog bed that I have bought. The colors were just what I had on hand, but doesn't it look like a big egg?
I made a couple of fitted tablecloths too. My son wanted me to make a tablecloth for his table, so I made matching ones for both tables. I bought this fabric (a big rectangular tablecloth) a couple of weeks ago at an indoor garage sale for $2. The elastic I used came from a gallon sized ziplock bag packed with notions that I bought at a sale last year for $1. Not only was there enough material to make both tablecloths, but there's more left over, so each fitted tablecloth cost me less than $1 in materials. I made both tablecloths in about 20 minutes, so they didn't "cost" me much in time either. I love repurposing! I LOVE this fabric too... the pretty cheerful colors... the kitchy roosters. It's just me :). I don't know why my camera wasn't able to pick up the colors of this fabric, but it is so much more vibrant in person, and not washed out at all!
Just so this post contains something made from recycled wool, and so you don't think I abandoned the braided basket, here it is... still in progress.
I will eventually finish it.
So, what have you been working on?
Tuesday, March 6, 2012
It's Tutorial Tuesday! Make an easy, but awesome recycled wool quilt!
I wanted a nice looking throw blanket for the family room, to keep on the couch. I was originally going to just make one with squares and rectangles, since most blanket patterns frighten me with their intricacy. I get easily intimidated, and tend to stick to easier projects. When I saw this quilt, The Beekeeper's Quilt by Tiny Owl Knits ...
... I loved the look of it, but that quilt is made of hand knit "hexipuffs". I don't know how to knit, so I made one with felted wool! I printed this hexagon, that I found online, and used it as my pattern. If you want to be done quicker, you can use a bigger hexagon, like this one, but then you can't utilize much smaller scraps.
I learned as I made this that the stiffer felted wools worked best for this. Felted cashmere, soft angora blends, etc. did not work very well. I didn't want the blanket to be stiff either, so I found that felted lambswool worked best, but you can use just about any felted wool.
First you will want to pick your colors. I tend to gravitate toward natural colors, but this time I wanted bright & cheerful! I used mostly scraps that I had on hand, and arranged them randomly. If you are more adventurous than me, you can make patterns, like on this antique quilt, that I saw at a flea market this weekend:
For a child that loves soccer, I think this would be adorable in black & white, like a soccer ball! For inspiration on patterns, simply Google "hexagon quilt", and click on the "images" tab at the top. Apparently this isn't an original idea ;).
Molly, from the Finish Something Already blog, shared her techniques with me (& now with you!), that she used on her gorgeous quilts.
One of Molly's beautiful recycled wool quilts:
Simply put 2 pieces together and zig-zag stitch right down the line. You will want to press the pieces together a little, as you sew, so they don't move apart, and they are snuggly sewn together.
Now just keep sewing more hexagons on, until the blanket is the size & shape you want. If you like the looks of the edges, you can leave it as-is, and be done.
I wanted a more finished edge, so I cut the edges evenly...
... then folded back the edge a 1/2 inch, and zig-zag stitched it down to the back.
the back:
the front:
I ironed it with steam, to get out the ripples, and I was done.
(like my posed reading pic? Lol)
It was super easy, but be warned... this took many hours to make! I found that the end result was was worth the hours I put in though, and I was glad I was able to use up so many scraps. What do you think?