Friday, November 26, 2010

Something you won't find at my craft shows


You see the finished products & the tutorials I post here. They are finished, and look good, right? Good ideas, and pretty products? Now what you don't see is my "mistake pile" next to my sewing machine, that is almost as tall as my sewing machine, that is awaiting some quality time with a seam ripper. What you also don't see is the great ideas that weren't so great after all. I made what I was going to call "oven mitt-ens", basically a large thick mitten, like my regular mittens, but with more arm coverage. I thought it would be cute, and something different than the same old oven mitts. Great idea, right? So I make the pattern, make the tester prototype, and i'm using it to get a pizza out of the oven. It's working great, so i'm feeling happy about my cool new oven mitt. Then I go to switch hands to hold the pan with my left hand, so I can cut the pizza with my right. That's when I realized it was hand specific, and could only wear it on the right hand.

I'll still use it (when nobody else is around), but I won't be making any more "oven mitt-ens"!

Wednesday, November 24, 2010

What I've Been Working on Wednesday


Meet Victoria Marie, the newest member of the Resweater family! I made a beret hat from the circles that are left over from making the adult sized berets (tutorial here), and it was the perfect size for an American Girl doll, or other 18" dolls (Victoria is an Our Generation doll), so I am going to make some girl/doll sets of hats. Hopefully i'll have some time this week to make some!

Last week my mom gave me some custom orders for some friends of hers, so i've been busy making those. I'm pretty happy with how they all turned out :)


So, what have you been working on? Feel free to post pictures of your finished projects on my FB page!

Tuesday, November 23, 2010

Tutorial Tuesday - Recycled Wool Cardigan Hat!


Please excuse my lousy lighting self portrait above. I assure you the hats look much better in real life! This hat was inspired by this fab tutorial, but alas, I am lazy and decided there had to be an easier way! Are you ready for the Resweater lazy version? ;)

Step 1 is to find a felted wool, or cashmere, cardigan with buttons down the middle. I know a cool place you can get one, if you don't have a cardigan to work with ;)


Next, I sewed a little between each button, just so it wouldn't gap open. I used a contrasting thread to show you, but it's still a little hard to see... sorry about that.


Next, Cut the biggest circle that your sweater will allow. The bigger the sweater, the bigger the circle (the sweater I used was a women's medium for a reference).


Now take a piece of very stretchy felted ribbing, and cut it to fit your head the way you want it to. It can be the ribbing from the sweater you cut the circle from, or you can take some from another sweater like I did. I like the contrast.


Sew your ribbing into a loop. I used my new machine's fancy stitch to get a flat seam (love it!).


Sew your the unfinished edge of your ribbing to the edge of your circle, wrong sides out, s-t-r-e-t-c-h-i-n-g the ribbing (not the circle!) as you go. I can stretch evenly as I go freehand, but if you are not sure, you can pin it at different parts, so you know if you are stretching enough or too much. Now turn it right side out & you are done!

Because of the stretchiness of the ribbing, these hats will fit both children & adults. A word of caution: Boys don't like to model girl hats.

Monday, November 22, 2010

Jack's Christmas present - Kangamonster pillow


This came out exactly how I wanted it to, so I am thrilled! I call him Kangamonster, because his mouth is a pouch (kangaroo). I made this for Jack, because he likes to take toys into bed with him, but doesn't like to bring his smaller toys, like action figures, with him. He's afraid they'll get stuck somewhere or fall off the bed. Now he can stick them in Kangamonster's mouth where they will be safe until the morning... unless Kangamonster is hungry!

Thursday, November 18, 2010

Off Topic Thursday - coupons & Swagbucks!


Part of what lets me stay at home with my son is being very frugal. My husband was laid off last year, and if we hadn't been frugal all along, it it would have been devastating. He got hired back, and things got back to "normal" quickly, but it was even more of a reminder to secure our future. Money saved is money earned! I coupon shop, and look for ways to save & earn money. Some of you are familiar with Swagbucks, but if you aren't, I highly recommend reading this post, and signing up through my link in the sidebar (so I get credit too!)! I have earned $100 in Amazon gift cards, since I signed up, less than a year ago.

Those who are familiar with Swagbucks... they are now giving out Swagbucks for using coupons!!! On the Swagbucks home page, if you click on "coupons", the same coupons that are on Coupons.com will pop up. The difference is, that if you print them and use them, you will get Swagbucks for each coupon used! I will be getting lots of Amazon gift cards this year!

To make things even better, If you go to the Swagbucks home page & click on "Daily Deals", you can purchse your Groupons (special deals in your area... I buy them weekly!) through them to earn more Swagbucks. Today's Groupon for me was $25 for an Oil Change, Tire Rotation, Wiper Blades, Battery Check, and Inspection, that I gladly bought (I am due for an oil change, tire rotation, and new wiper blades). This also earned me 280 Swagbucks (more than half of what I need to get a $5 Amazon gift card!)!

Can I get your opinions? Does this post seem spammy, or would you like to hear about money saving things like this occasionally?

Wednesday, November 17, 2010

What I've Been Working on Wednesday


This week I haven't been doing a whole lot of sewing, because i've been trying to get to all the housework that I neglected over the last month or so due to my craft shows. I did manage to make a few dryer balls, since most of it is done by hand, and it's a good in-front-of-the-tv craft (I can't watch tv without working on something). If you are interested in any of my dryer balls, they can be purchased here, or if you prefer to make them my explaination is here.

I also made 2 hats to test the new sewing machine...


Though I love my old Singer, i'm glad that my hat band seams will now look like this...


instead of this...


What have you been working on this past week? Feel free to brag about your latest project, or promote your shop on my Facebook page!

Tuesday, November 16, 2010

Tutorial Tuesday - patching ripped jeans

I got a new sewing machine, a Baby Lock BL9, and I am trying out some of the cool features on it that I don't have on my antique Singer. I love, and will always keep my Singer, but this Baby Lock is fun to play with!

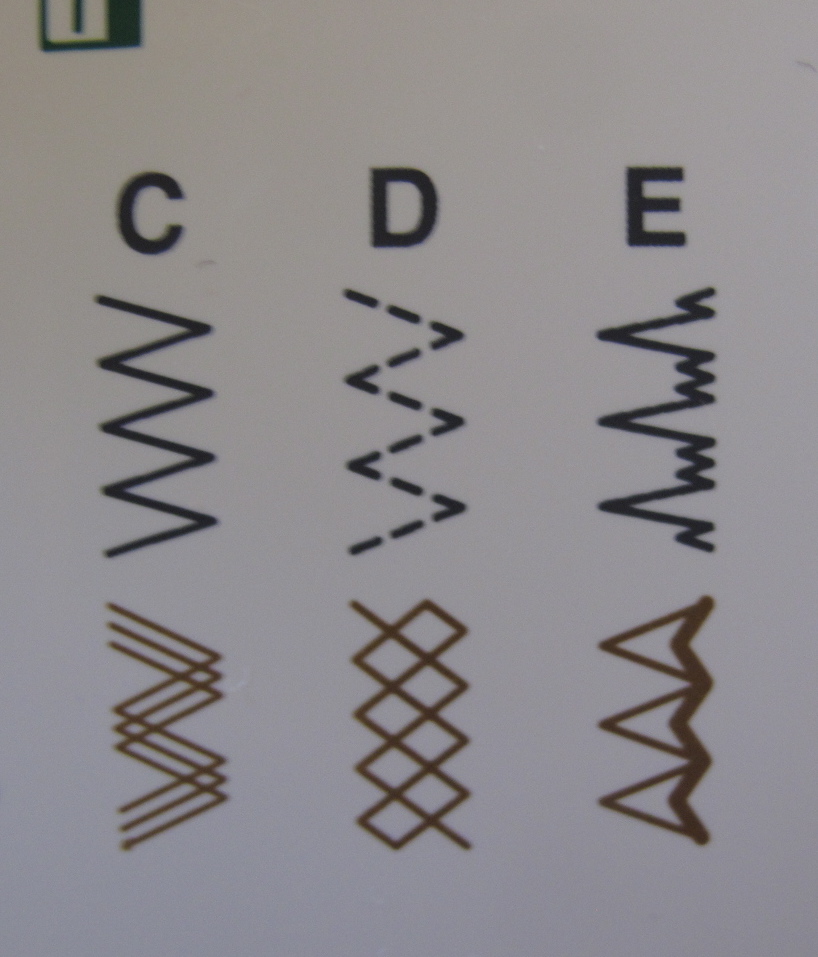
One of the features is zig zag & fun stitches, like these:


Now, i'm sure that this has been done before, one version of it or another, and i've probably seen it on a craft website before. I would love to give credit, but can't remember, so please let me know if you've blogged something like this & i'll link to you.

Ok, this is dedicated to all the moms out there with 5 year old boys & up! Jack's Jeans' knees were pristine, until he hit 5, and now he gets a hole in the knee every other week. Sometimes being green is just taking care of, and fixing, what you already have, so it lasts longer. Even after my son outgrows these, they are more likely to be worn again because they are "fixed", rather than be thrown away because they have a hole.

Ready? You will need a hole in the knee, and a scrap of soft felted wool or cashmere (what I used) that is a little bigger than the hole.


Now, seam rip an opening on the outside seam of your jeans big enough for you to comfortably sew.


Place your scrap on the inside of the jeans, and zig zag or funky stitch (I don't know the name of it, but I used the bottom "D" stitch, pictured above) all over the hole, holding the hole closed as best as you can. Now, turn the jeans inside out & sew up the seam you seam ripped, and you are done! Now you have the "destroyed" look that clothing stores charge more for! You can actually cut the jeans and do this all over, if you want that trendy look. I think it looks cute!

I like how this pair came out (please ignore the grass stains... i'll get those out later today)...

... and it went well with the overall "destroyed" look of those particular jeans...


On these, I wish I would have used a closer matching color, because the hole in this knee was bigger than the other pair, so the cashmere peeked through a little. I also could have used slightly darker thread to make it look better (I used light gray).


Overall, a quick, easy, and useful project! Jack's knees will stay warm this winter ;)