Showing posts with label Easter basket. Show all posts

Tuesday, March 8, 2011

It's Tutorial Tuesday! Woven recycled wool Easter basket!


I know I did an Easter basket tutorial last year, but I wanted a bigger Easter basket for Jack this year. He tends to get bigger things from the Easter bunny, instead of a lot of candy, like his favorite cereal that is never on sale, or that light saber he's been wanting ;), so he needs more room! Since I was making a new one, I thought i'd try something new, so here you go! You can make this any size you want. Last year's basket was easier than this one, because it had a lot less steps, but this one is still not hard. The hardest part is trying to figure out my explanations ;)

First step is to cut out your bottom piece or pieces. The size, and whether you want an oval or circle bottom, is totally up to you. If you are working with a heavily felted, stiff wool, you will want to cut one piece. Mine was still floppy, so I used 2 pieces for extra stability. I wish I would have used a stiffer wool. It would have involved less steps, and it would have given the basket more stability, and helped it to retain it's shape.


Next, cut 2 strips that together equal the distance around the basket + 1/2" (for seam allowances), and 2 strips of the sweater's ribbing, the same length & thickness (mine were about 2" thick, though it doesn't matter as long as they are all the same thickness).


Set aside the ribbing pieces for now. Take the 2 non ribbed strips, place them together right sides in, and sew the 2 ends. Now you can sew the strips (which now form a circle) to your bottom. I sewed mine so the bottom seam was on the inside, for a cleaner look, but you can make it so the seam is on the outside if you want more stability & it to keep a better shape.


Now you will want to cut strips for the vertical slats of the basket. You can cut them to any length, but the length of the strips will determine the height of the basket. My strips were approximately 6" tall, resulting in a basket height of approximately 9" (6" strips + 2" rim + 2" bottom piece - 1/2" on each end for overlapping to sew). My strips were 2" wide, and I pinned them to the inside of the bottom rim with about 1" in between each one. The number of strips you will need all depends on the size of your basket, the width of the strips, and the space you leave in between each strip (you don't even have to leave a space between the strips). I highly recommend pinning them all in place before sewing, so you know your spacing is ok.


Now sew all the way around, so all of the strips are attached.


Now make some handles. If you are using a thick wool you might only need to cut them to the size you want. Since I had a floppier wool, I used the technique from last year's Easter basket tutorial here. Now take your ribbing pieces that you set aside and sew your handles in the center of each. After you do that, sew the ends togther, and turn right ride out. This is the top of your basket.

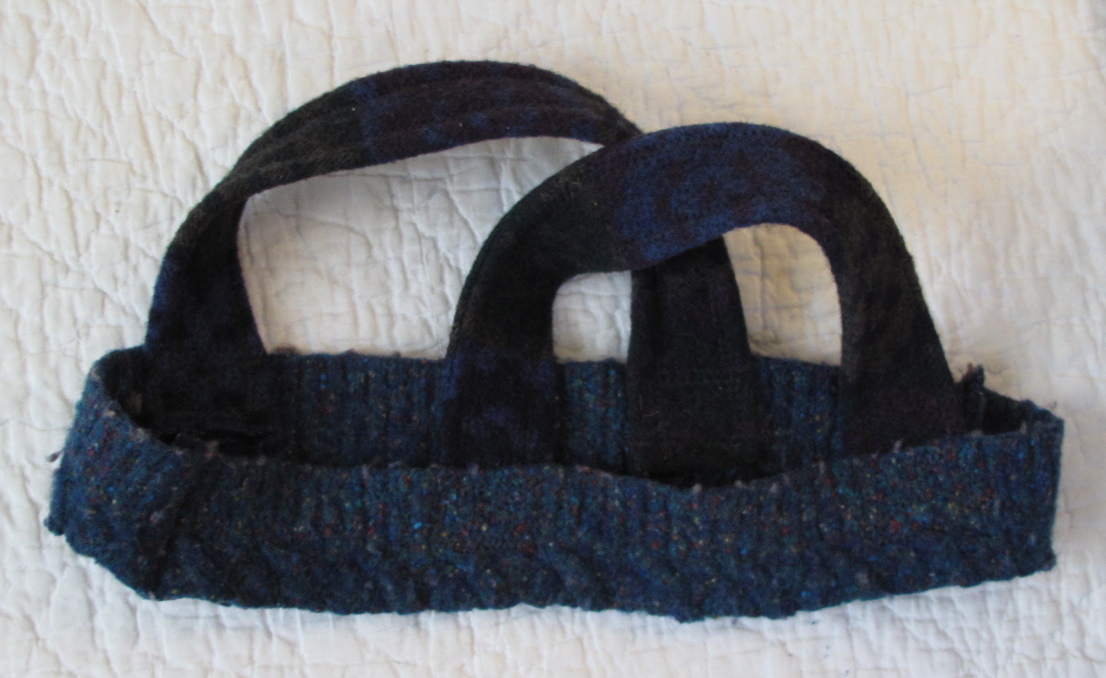
Now you can sew the ends of the strips to the top rim, just like you did with them on the bottom. I have no idea why I don't have a picture of this step, but I don't :( . Hopefully you can envision it. Now it's time to make your horizontal slats. If you have a softer felted wool like mine, you will need to make them double thick, so you will need 4 strips for each slat... 2 to equal the girth of the basket, and 2 for the second layer. Mine had 3 double thickness slats, so I needed 12 pieces.

To make each of the 3 slats, I laid each pair horizontal, overlapping 1/2" and sewing where they overlapped. I then sewed 2 of those together, right sides out, to make one long double thick slat.


Now weave the horizontal slats in & out of the vertical slats, overlap the ends a little & pin them together. Once you have all your slats in, you can sew them where they are pinned, and slide your sewn ends behind a vertical slat.

If you wanted a plain basket, you are done! I thought I was, but my son informed me that Easter baskets need to have eggs on them, so I cut some eggs out of colorful scraps I had and hand sewed them on.


I had some felted green in my stash, so I cut some into strips for Easter grass too.


Now I have a cute woven basket...


... to leave out for the Easter Bunny.

Tuesday, March 23, 2010

Tutorial Tuesday - recycled wool Easter basket!


I am glad I decided to take the time to make Jack his basket this year. It turned out nice, and we will enjoy it year after year. He really likes it and is hoping the Easter bunny will bring him Panda Puffs (his favorite cereal) and dried strawberries. He's making it too easy for the Easter Bunny ;)

Ok, on with the tutorial! First felt the sweater you will be using, then cut straight across at the armpits, unless you want a shallower basket. You can cut it lower to make it shallower. The size of the basket depends on the size of sweater.


Now you have a sweater tube. If you are planning to embellish this is the best time. I made egg appliques out of colorful scraps and sewed them all around. Now take the narrower end (on mine it was the waist) and fold it inside, so the 2 edges are together and the fold will be the edge of your basket.


Determine whether or not you want a round or oval bottom (you may not have enough enough sweater to make a round bottom, depending on the sweater), hold the folded tube in the position you want and trace it on a piece of paper or cardboard. That will be your pattern, and you can cut a piece to make the bottom of the basket with it. I recommend cutting 2 pieces to double it, if you are not using a thick felted sweater, like I did.


You can now sew your folded tube to your bottom with your "right" sides (the sides you have embellished and/or want on the outside of the basket) in. I was thinking I would have to sew it by hand because of the thickness, but the 3 layers just fit on my sewing machine.


Now cut 2 strips the length, but twice the width (+ seam allowance), you want the handles to be. fold them over right side in & sew them shut. You can pin them if you want, but I just did it to show where you will be sewing.


Now turn your sewn tubes inside out, so the seam & "wrong" sides are on the inside. You can leave them tube-like, or sew down each side to make them flatter, like I did, depending on how you want your handles to look.


Now just sew them on where ever you want the handles to be. There was no way my sewing machine could handle all of those layers, so I sewed the handles on by hand, stitching the usual square with an X in the middle (is there a term for that?). I'm probably going to redo them, since I did a sloppy job of getting them on, but they are still on good, even if I don't. Now it's ready for Easter goodies!

Wednesday, January 20, 2010

What i've been up to


I've been doing a lot of sewing lately, so I thought i'd show you what i've been up to. I've been making dryer balls (I really thought i'd get tired of making them, but I still enjoy it!) to sell at this summer's fiber fairs. They are great for keeping my hands busy. I cut the wool and wind the balls while I watch tv, and I like to do the final hand sewn seam while i'm waiting places, like my son's hour long gymnastics class. Ever since I posted that blanket tutorial last week, i've also started on a blanket. I have been making "bricks", 6" x 12" pieces, that I will make into 1' squares for my blanket when I have enough of them. I plan to use a vintage wool blanket as the backing, so it will be super warm!

Dryer ball pieces, and finished dryer balls (I have over 40 completed!):


The blanket "bricks", and an "egg" I need to improve on. I want to make an Easter basket for my son, and sew egg appliques to the side, made from this sweater with fair isle stripes.


Here is where it all happens, my beautiful antique sewing machine. My mom sewed, and taught me to sew when I was little. I also took Home Ec classes when I was little, but it had been so long since then. When my elderly neighbor's wife passed away, he gave me her sewing machine, so it means a lot to me. I had no clue how to use it, but I was not going to let it sit unused. I took a private sewing lesson a little over a year ago, and now i'm a sewing fool, as apposed to just a fool ;) !