Sometimes I actually, *gasp*, wear the sweaters I bring home ;) I loved the color of this cashmere cardigan, but it was a boxy & unflattering shape. All I did was create a new side seam, and cut off the excess.
What a difference... t looks like I lost 10 pounds!
Before...
After...
Saturday, October 30, 2010
Wednesday, October 27, 2010
What I've Been Working on Wednesday
Guess what I made this week? Yup, you guessed it... mittens! I did manage to make a pair of merino running pants (probably the next tutorial for Tutorial Tuesday!), and one lone hat. I think I need to concentrate on something else next week ;)
The cashmere mittens & doublers...
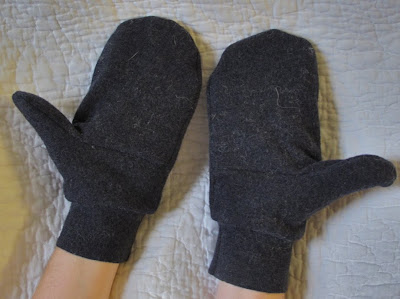
The wool & wool blend mittens (the pair in the bottom right corner aren't ironed yet. BIG difference! ...
the runners mittens (that are begging to be ironed!), and the lone hat.
It's been a productive week!
The cashmere mittens & doublers...
The wool & wool blend mittens (the pair in the bottom right corner aren't ironed yet. BIG difference! ...
the runners mittens (that are begging to be ironed!), and the lone hat.
It's been a productive week!
Tuesday, October 26, 2010
wonky lookin' mitens
Tutorial Tuesday - Recycled Wool Mittens & Mitten Doublers
Edited to add: I take it for granted that everyone knows the true "first step"... felt (wash it in a hot wash & throw it in the dryer) your sweater before you cut your mitten pieces. This will prevent your pieces from unraveling.
The first step is to create your pattern. I don't know how to make patterns to scale online, but hopefully you can create one for yourself, based on their shapes. It isn't too hard, considering that I made a pattern for my son's mittens the other day from eyeballing the adult pattern. I originally started with this pattern, but it was much bigger than what I wanted, so I tweaked it until I got my current pattern. Maybe that will work best for you too. If you eyeball it, the important thing to remember is to make sure your 2 palm pieces end up being a total length of about 1/2" longer than your back of hand piece, since you will be sewing the 2 pieces together, that will be your seam allowance. You will be starting with 4 pieces... the back of the hand, the 2 palm pieces, and the cuff. The cuff can be the cuffs of the sweater (what I used here), or a piece of ribbing from the sweater sewn into the same tube shape.
Ok, ready? Sew your 2 palm pieces together in the middle, wrong sides out, creating the thumb.
Now sew the back of hand piece to your palm piece, remembering wrong sides out. You will want to move the thumb out of the way as you go.
If you are making Mitten Doublers, that's it... you're done!
Making mittens? Now it's time for the cuff. Take your cuff & stick it inside with the cut edges lined up. When you look inside, you should see the "right " side without the seam. Now sew your cut edges together, stretching a little as you go.
Now you are done. Flip them right side out, roll up your cuff, & enjoy your cozy, eco friendly, cute, naturally insulated mittens!
At this point many people like to secure their cuffs with a button or decorative stitching, but I like to leave them as-is, so they can be rolled down & stuck in a coat sleeve when it's extra cold or snowy. The choice is yours!
Labels:
cashmere,
diy,
Mitten Doublers,
mittens,
recycled wool,
sweaters,
Tutorial Tuesday
Sunday, October 24, 2010
Runner's mittens
Can you tell i'm on a mitten kick ;) ? Anyway, I took up jogging over the summer, so this is going to be my first winter as a runner, and i'll be learning as I go. Friday morning was the coldest weather i've jogged in, 40 degrees, and it felt great! When I started out though, my hands were very cold, but by the end were more than warm & sweaty. I wasn't wearing anything on them, and wondered when & what I should be wearing on my hands, so I started Googling. Apparently when it's that cold, I should be starting out with a thin pair of runner's gloves or mittens. They should be thin, breathable, and moisture wicking. Hmmmm... I know something that does all that... merino wool! It does everything those sports fabrics do, and more. I made myself a pair, and will be selling them at my upcoming craft fairs, for you local folks that are interested. As a bonus, they can worn inside other mittens, as a doubler, as well.
Saturday, October 23, 2010
Jack's mittens
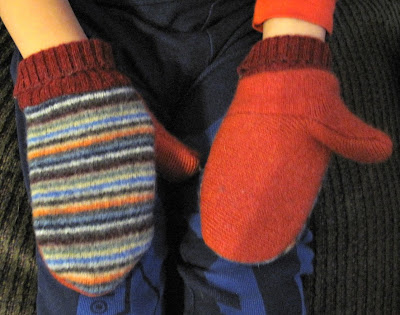
I whipped up a mitten pattern this morning for Jack sized hands, and made him matching mittens for the hat he picked. Luckily, I had enough scraps in those colors on hand. He excitedly said, "Look, Mama... they match!" when I showed him the finished mittens :) I lined them with a thick cashmere, so they are super cozy! I even got him to let me take a few pics of them.
Jack's hat
Friday, October 22, 2010
So... what are YOU working on?
&
You know what i've been working on, since I blog about everything I do, but what wonderful wooliness have you been working on? I'd love to see it! Just head over to my Facebook page by clicking on "Resweater on Facebook" on my sidebar. As long as you have a Facebook account & "like" my Facebook page, you can post whatever woolformation you want on my wall. Be sure to leave links to your blogs & shops, if you want people to check out more (Free advertising peeps!). Have any questions about wool or my shop? Post them on my Facebook wall. I hope to see you there!
Wednesday, October 20, 2010
A new shop & a new feature for Resweater
I wanted to have an online venue for my finished products, so I opened up a second shop, Resweater Etc. I set it up, and even added a few things, and realized that it's too much work for me to take on right now. It is time consuming to list, especially since I have to be the eyes & fingers in my descriptions, since my customers can't pick them up & feel them. It is also time consuming to keep them inventoried, and organized in between craft shows too. If this were my only shop & venue, it wouldn't be a problem, but I have my Resweater shop, my wholesale orders, and my craft shows. Preschool is only 3 hours long ;) ! I feel bad though, not being able to offer my finished products online, especially for those of you that have asked for them, so I will be doing something new. Wednesdays will now be "What i've been working on Wednesday", and I will show the stuff I made that week. Just like Sweater Sunday, this will give you an opportunity to call dibs on anything you want to buy, before it is offered up to my wholesale customer or craft shows. What do you think?
This is what i've made over the last couple of weeks...
Diaper covers: medium longies in a thick merino, large double layer soaker in lambswool & merino, small double layer soaker in lambswool.
Lots o' mittens! By the way... they look perfect on hands, but look so wonky & oddly shaped laying there. Does anyone have any mitten secrets they would like to share? Steaming? Ironing?
Lot's o' Mitten Doublers.
Labels:
diaper covers,
longies,
Mitten Doublers,
mittens,
resweater,
resweater etc,
soaker,
soakers
Tuesday, October 19, 2010
Tutorial Tuesday - Recycled Wool Baby Sleep Sacks
My niece just had a baby (he's SO cute!), so I wanted to make things for her. One of them was a sleep sack. I liked the idea of a recycled wool sleep sack, because they are so versatile. You can use it as a blanket at night, as a diaper cover, or as a bunting. I found this tutorial, which is brilliant, but I don't know how to frog (unravel), so I decided to make a felted version.
You will want to use a big mens sweater for this. The bigger the sweater, the bigger the sleep sack. I believe the lambswool sweater I used was a men's medium or large. After you felt your sweater, cut the sleeves off at the arm/shoulder seams and remove the seams on the sleeves.
Now lay your sleeves out flat, and make the corners rounded. This is also the time to narrow the top if you need the ribbing to be tighter (measure your baby all around, under the armpits, and minus off an inch or 2).
Now sew all the way around, wrong sides out, and of course leaving the top open (that's how the baby will get in). Now turn it right side out, and you have a cute, cozy, natural, fire retardant, naturally hypoallergenic, insulated, breathable little cocoon for your little one (or a great baby gift for someone else's)!
And a special thanks to Soupy, Jack's outgrown doll, for offering up his model services yet again ;)
Labels:
diy,
felted,
recycled wool,
sleep sack,
sleepsack,
soaker sack,
tutorial
Wednesday, October 13, 2010
Resweater craft show schedule, for the local folk
I will be at 2 local shows this November, in case anyone has been dying to buy a hat, mittens, ornament, diaper cover, or dryer ball from me ;)
Bella Viaggio, held at Christ Community Church in St. Charles, Il.
Saturday, November 6th, 2010 - 8:30 am-2pm
Mother's Club of Geneva Holiday Arts and Crafts Show, held at Geneva High School in Geneva, Il.
Saturday, November 13th, 2010 - 9:00 am - 3:00 pm
Come see me!
Tuesday, October 12, 2010
Tutorial Tuesday - recycled wool elf hat
These are seriously cute, and seriously easy to make! It took me a while to come up with a pattern because I kept making the mistake of making a straight edge at the bottom. When the light bulb went on, and I rounded the bottom, it turned out how I wanted. Once your wool is felted (I like these lightly felted, just so it doesn't unravel when you cut), cut this shape (leaving a flat point at the top, about an inch long), a few pieces of felted seams, and a piece for your headband:
If you have a piece of ribbing to use, that's great, but if you don't you can cut a rectangle to the length you want your headband, and twice the width. Sew the 2 cut ends together, wrong side out...
then fold it in half, wrong sides in.
Now take your triangle and fold it in half, wrong sides out. You'll want your seams on the inside of the point, with the ends of them peeking out of the point a little. Now sew across the point a couple of times to secure the seams (tassels), then sew the side edges together.
Now you can sew your headband on, stretching as you go. It should look like below... wrong sides still out on the hat part, band on the inside. I suggest starting at the seams, and lining up the hat seam with the hat band seam.
Turn it right side out, and voila! ... cute hat! Wasn't that easy?
I love those foam heads you see in the pictures! I just picked them up recently to show what my hats look like on a head. When I went to get them, my son asked where we were going, and I told him "foam head shopping!". He would laugh and ask "No, really... where are we going?", and I would reply "to buy foam heads!", and he would laugh again. This went on the whole ride to the store, and he was tickled that we actually bought foam heads! No point to this story, but I smile now whenever I look at the foam heads :) He's totally bored in this picture, but isn't he cute?
Thursday, October 7, 2010
Feature Friday - Love, Rosie
If I had a baby, my bank account would be empty after finding this shop ;) . Love, Rosie's Etsy shop carries the most adorable hats! These recycled wool & cashmere hats would be the hit at any baby shower. Paired with a sleeper in a matching color, they would make an adorable Halloween costume too! Incredibly cute baby not included. You must provide your own ;)
Labels:
alien,
animal print,
baby,
baby hat,
bonnet,
bunny,
Love Rosie
Subscribe to:
Posts (Atom)