Wednesday, November 30, 2011

It's What I've Been Working on Wednesday!


After making stockings for my son, my husband, and I, I realized someone was missing.... our dog Spots! I made her a stocking too. When I showed it to her, she instantly got the zoomies (if you have ever had a dog or cat, you have probably witnessed the zoomies at one time or another). It almost seemed like she was excited about the stocking, and we laughed so hard :). No point to this story... it was just funny.


Monster knee patch? Pure genius. Not my idea, but I love it! I found it on Pinterest. Have you been on Pinerest?! It is addictive! It is a virtual bulletin board, to "pin" all those fun ideas you run across online. Anyhow, I found this idea here, and just happened to find a pair of my son's jeans with a hole in the knee, so there you go. The thing I did differently than the original tutorial, is that I seam ripped the side of the leg, so I could do the sewing with my machine. I figure the patch will survive more washings this way, and it only takes a few seconds with the seam ripper... much faster than hand sewing.

before & after:


If you have an older child, and this is too cute for them I posted a tutorial a while back on how to repair a hole with the "destroyed" look, here.


What have you been working on?

Tuesday, November 29, 2011

It's Tutorial Tuesday! Make a recycled wool stocking from scraps!


I have a confession. My family has been using store bought stockings until this year. Two from garage sales, and my son's stocking is from the dollar store. Isn't that horrible? This year I have decided to finally make ours, and here's a tutorial to boot!

First you will need a stocking to trace, to make a pattern, or just wing it... trust me... I have no artistic ability, and I can do it! You can also use Martha Stewart's stocking template, if you need a pattern. Now trace/draw & cut out 2 patterns.


Take the front pattern, and cut it into the pieces you would like.


Now use your pattern pieces to cut your felted wool pieces, remembering to leave a seam allowance (1/4"or 1/2" doesn't matter... whichever you prefer) at all the edges. Now sew your pieces together, remembering to keep right sides together.


Now take your uncut pattern, and cut out your piece for the back. You could also repeat the process of the pieced side, if you prefer the whole thing to be pieced.


Sew those 2 pieces together, right sides in, and don't sew the opening closed at the top!


Now for the top cuff, you can use a turtleneck, if you have one that's big enough & coordinates, or you can make the top from 2 rectangles sewn on each end. You will want the rectangles to be a little wider than the width of the top of the stocking, by about an inch.


Now to make a hanging loop for the stocking. Just take a strip of wool (mine was approximately 6" long, and 2 1/2" wide), and fold back a 1/2" on each side & sew it down. fold it over with the sewn edges touching. Now you have a loop.


Now, with your stocking still wrong sides out, place your cuff inside the stocking opening, so you can see the right side of the cuff when you look inside. Place the hanging loop upside down (cut edges up) at the back, by the side seam. Now sew these together, stretching lightly, and evenly, as you go. Since the cuff will be slightly bigger than the opening, you may need to stretch the stocking opening ends a little more than the cuff to even them out.


You don't have to, but to get a smoother stocking, you can now turn your stocking right sides out, pull the cuff up, and sew down that seam, so it's not so bulky. I used a zig-zag stitch, but a regular stitch will do the job too.


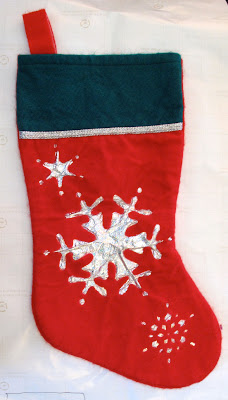
Now, if you haven't already, flip your stocking right side out & fold the cuff down. "Hey... that doesn't look right!" you are saying about now. Iron it! It is amazing what an iron can do ;). Now I have 3 great stockings for our family! Jack's is a little wonky looking, but that was because he wanted his bigger, and I tried to wing it without making a new pattern (I rushed through the ironing too). Silly me! I am not worried about it though... it will look perfect when it is stuffed with goodies! :)

Monday, November 28, 2011

Wreath ornament kits!


I am selling wreath ornament kits in my shop this year! Included in each kit is enough felted wool & cashmere squares to make at least 2 ornaments, plus 3 coordinating seams to make the hanging loops. They are only $5 a kit (makes 2 or more ornaments), and $2.50 for shipping (US). Shipping is free on any additional kits.

These ornaments make great gifts, and older children can make them.... the perfect thing to keep little hands busy over Christmas break! My son had just turned 4 when he started stringing these himself (I tie the knots). I recommend having them poke through the square into a pillow, if they are little, so they don't poke their fingers with the needle. Grownups love to make them too!


You can choose from Christmas colors (reds, greens, whites/creams), earthy colors (browns, greens, tans, creams, rusts), bright colors, mixed colors, or you can request special colors (but contact me first with special requests, so I can make sure I can fill them).


Want more information, or to buy some? Go here!

Sunday, November 27, 2011

Resweater local (to Chicagoland) craft show this Saturday!


If you live locally, i'd love to see you at my last craft show of the year! I'll be at Alleluia! Lutheran Church in Naperville (directions & map can be found here) from 9am-3pm on Saturday, December 5rd. They will have a bistro with homemade pastries, soup, paninis and desserts for lunch, so grab a friend and make a day of it! Suggested entry fee donation is $1 or canned goods/non-perishable items for the food pantry.

Saturday, November 26, 2011

It's Small Business Saturday, and a sale!!!


It's Small Business Saturday, and I plan to buy a lot today!! Please feel free to post any great sales you might be having, or just pictures of recycled wool or cashmere items from your shops that would make great gifts, on my Facebook page today! I need ideas, and so do my readers!
As a small business, I will offering a sale of my own! Today only, buy any4 sweaters from my shop, and get one of equal or lesser value free! This counts for every 4, so if you buy 8, you get 2 free, and so on! This offer applies to individually listed sweaters only, and not my mystery lots.

Friday, November 25, 2011

It's Feature Friday! Cashmere Rose


Last week I featured Wool Crazy, and her adorable critters, but she has a second shop, with her sister... Cashmere Rose! At Cashmere Rose Etsy shop, you can find gorgeous cashmere tops & sweaters, pretty cashmere hats, cute skirts, and more!


Wednesday, November 23, 2011

It's What I've Been Working on Wednesday!


I love cardigans & hoodies, so when I saw this cashmere hoodie in my size, I grabbed it out of the pile of sweaters that had just come in. I looked it over & found the zipper separating at the seams a little. This made me giggle, because it was probably the reason that the hoodie ended up at the thrift store... silly non-sewing people!


After 30 seconds at the sewing machine, it was like new again. While I was there, I grabbed one of my owls that I made for the owl skirts, and sewed it to the chest.


I then took a fun multi-colored seam and pinned it to the existing hoodie drawstring, and pulled it through. I think that made it a lot more fun, don't you!


I love my new hoodie :) !

What have you been working on? Add anything fun to your online shops? Feel free to post your finished recycled wool (or cashmere!) projects on my Facebook page!

Tuesday, November 22, 2011

It's Tutorial Tuesday! Boot cuffs & leg warmers!


These recycled wool boot cuff leg warmers would make a great gift for all the girls & teens & women on your Christmas lists! Sweater cuffs are very in right now, and you can match them to their coats, or just go for fun colors & patterns!

Remember my leg warmers tutorial? You don't? Go here!


Ok, now go make them, making the top of them a smidge smaller than the shaft of the boots. Do you have your leg warmers?


Ok, now put in on inside out.


Please note that the example pair in this post are a smidge small for my non-small legs... they were the only ones I had handy & had made them to match a size small skirt:

Anyway... now just fold the top down over the shaft of the boot. That's it! Now you have a pair of leg warmer boot cuffs! Not only are they super cute, but they are super cozy!

Friday, November 18, 2011

It's Feature Friday! Woolcrazy


I featured Woolcrazy's Etsy shop a few years ago, but it's time to revisit. Her uber adorable recycled wool & needle felted critters have gotten even cuter! I think I will be paying her shop a visit next Saturday, for Small Business Saturday! I will be visiting a few shops then :).