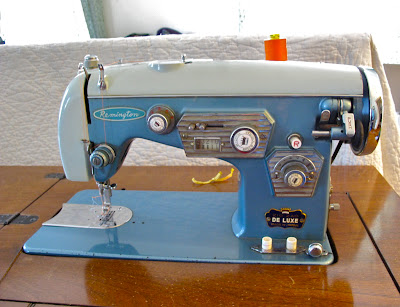
I may have to join some kind of 12 step program if I buy any more sewing machines, but how can a sewer resist this beauty for $5? Now that's a garage sale find!
It works, and has the wooden table, owners manual, and extra feet & bobbins too!
The panels remind me of things that would be on the dashboards of antique cars from the 50's.
I tried to Google it, but there was no model number on the machine, and the owners manual didn't even have any company information on it anywhere. No manufacturers name, no phone number, no address... not even a "made in" stamp.
What kind of machine is it, you ask? Well, here's where it gets interesting. The machine has 2 plates on it, one that says "Remington", and one that says "Zigzag Deluxe Made in Japan".
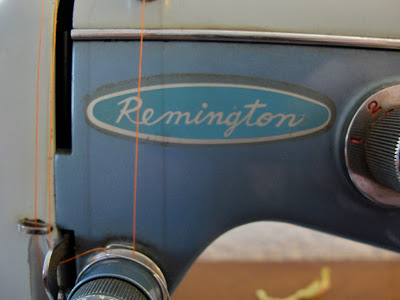
So Remington made it, right? Well, from what I was reading online, Remington did not make any sewing machines after 1902, but this machine was definitely made around the 1950's. They would manufacture these machines in Japan, and once they reached the US, US companies would stick appealing name brands on these. Here's one tidbit I found:
"In the late 50s to early 60s, there were numerous instances of distributors marketing the Japanese machines with names that were the same or almost the same as US companies who sold appliances, cars, etc. I specifically remember Cadillac, Ford, Mercury, Remington, and Sunbeam. As I recall, the appliance mfgrs were more upset by this than the car companies, probably because they thought there could be a legitimate confusion over whether the machines were theirs. If memory serves, Remington successfully sued and stopped the use of their name, and I believe that the same distributor then started using Sunbeam. I even recall that at one time, they tried to get away with it by spelling the name "Sunbeem." "
The only downfall to this machine, is that it is missing the 20 cams it should have, for fancier stitches. Since this machine doesn't have a model number, and all I have is grainy sketches of them (in the manual) to go by, I may not be able to locate replacement cams :(. I'm going to stop in this week, to my repair guy, and see what else he can tell me. Maybe he would know. Meanwhile, I have left my number with the woman I bought it from, in case she finds them. It was her mother's machine, and she said she doesn't ever remember seeing those cams, but she will call if she finds them.
I'm getting over a nasty cold, but hope I can get some sewing time in with Old Blue this week!
Saturday, April 28, 2012
Tuesday, April 24, 2012
It's Tutorial Tuesday! Make a recycled wool mustache!
Here's a fun and quick little project! You will need some black felted wool (I used merino), and something to hold the mustache up with. I found this egg dipper, from an Easter egg decorating kit, floating at the bottom of my junk drawer. It worked out perfectly, once I bent the end to the shape of the mustache, but you can use a chop stick, pencil, etc. as well.
Now, find a template for a mustache you like. I used this template, but if you search Google images for "mustache template", you will have hundreds to choose from.
Now cut out 2 mustache pieces, using your template.
Sew the 2 pieces together with a simple straight stitch, leaving a 1/2 inch opening on the bottom side.
Now just slide the egg holder (or pencil, chop stick, etc.) in, and you are done. I chose to add a little glue to the end I was sliding in, to reinforce it a little, but it wasn't necessary.
Now you're done! Go have fun!
Labels:
Felted Wool,
mustache,
mustache on a stick,
recycled wool
Wednesday, April 18, 2012
It's What I've Been Working on Wednesday!
I had bought this pullover hoodie, just because it was 50 cents at the thrift store, and I liked the colors/stripes. I am not a fan of pullovers (it's a sensory thing for me), and it was a bit snug, so I went to work on it. I simply cut straight down the center...
and looked through my stash for a zipper, but they were all too short. I finally found the button down part of a felted wool cardigan, I had in my scraps, and just sewed it with a zig zag stitch to the top of the hoodie edge. It took about 5 minutes, and I love how it turned out!
It needed a little something, so I appliqued a recycling symbol to the chest. Now I have something to wear to all those upcoming Earth Day celebrations!
Tuesday, April 10, 2012
It's Tutorial Tuesday! Super easy no sew portable dog bed
This one has nothing to do with wool, but I thought i'd share anyway. All you need is an old throw pillow & vintage suitcase, that are size appropriate for your dog or cat.
Step 1: Place pillow in suitcase.
Step 2: Place thick bungee cord around hinges, with the hook parts in the back. This will keep the lid from falling down on your pet. I made a fabric cover to go over it, but it really didn't look that bad before I did, so that is totally optional.
Step 3: insert pet. This one will happen automatically. They will most likely be waiting to jump in.
You are done! Now, you can embellish all you want from here, but you have a cute recycled pet bed right now. I like that it is still a functional little suitcase, because I plan to pack all her doggie things (dog food, dishes, toys, leashes, extra bags) in it when we go on trips, and this will traveling with her so much more convenient!
I pinned a tiny quilt to the lid, that I had found at a sale somewhere. Not only do the dogs on it look like Spots, but it even says "spot" on it, so I thought it was perfect. Since I would like the option of being able to clean it, it is just loosely pinned to the lid.
Now, if you are really industrious, you can embellish further by adding legs, custom upholstery, and decorations, like some have done. Here are some impressive & adorable ones I found online. Just click on each picture to go to the website it originally came from.
Labels:
cat bed,
diy,
dog bed,
pet bed,
pet beds,
suitcase,
Tutorial Tuesday,
vintage suitcase
Friday, April 6, 2012
Easter egg hunt sweater giveaway & sale!
Want to go on an Easter egg hunt for sweaters? I have picked 25 sweaters at random that will be free if anyone buys them from my shop between now and Monday, 4/9/12 at 3pm central time. Simply place your order, like normal, and if any of the sweaters in your order are one or more of the 25 sweaters, I will refund you your money for those sweaters!
To save even more, use coupon code "Easter" at checkout to get 50 cents off of each sweater you buy between now & Monday, 4/9/12 at 3pm central time!
ETA: Someone has already found one of the "eggs" (an aqua cashmere cardigan)! There's still 24 "eggs" left!
Labels:
easter,
egg hunt,
Resweater giveaway,
sale,
sweater sale
Wednesday, April 4, 2012
It's What I've Been Working on Wednesday! book eggs!
The Easter Bunny likes to bring books to our house, this year he'll hopefully bring cool Lego books ;), so I made some felt eggs to put them in. They are quite wonky, and I wish I would have taken my time with them, but it is what it is. I should have used a straight stitch, so they wouldn't have rippled as much. Maybe next year i'll make some better ones.
I made the backs with an envelope closure, so I can just slip the books in.
I'm sure my son won't mind the wonky eggs once he sees what's inside of them ;).
Tuesday, April 3, 2012
It's Tutorial Tuesday - Some last minute Easter projects!
If you have a little time left this week for crafting, you may want to check out a couple of smaller Easter projects.
This super adorable bunny barrette, comes to us from While Wearing Heels. She just won't stop coming up with great tutorials! For the full tutorial, click here.
These cute little felt chicks come from DisneyFamily.com. For the tutorial, click here.
This super adorable bunny barrette, comes to us from While Wearing Heels. She just won't stop coming up with great tutorials! For the full tutorial, click here.
These cute little felt chicks come from DisneyFamily.com. For the tutorial, click here.
Labels:
barrette,
chicks,
Disneyfamily.com,
Felt,
hair clip,
While Wearing Heels
Subscribe to:
Posts (Atom)