Saturday, December 31, 2011
Some Resweater randomness
See this sweater? It is a blend. I bought this to wear, and since it had a really low wool content, I threw it in with a load of laundry, and washed it on "cool". It came out lightly felted, like a merino usually does after a hot wash! Since I could no longer wear it, I was curious to see if it would fully felt, so I through it in with the next hot load. This is the results... the sweater underneath is the same size the gray one started out. My 6 year old couldn't fit into it now.
How much wool content, you ask?
Yep, 30%. Isn't that crazy? This is why I laugh when I see tutorials that say "you must use 100% wool or it will not felt". Granted, this is an unusual result for such a low content, but higher wool content blends (I only sell 70% & higher wool content blends) are pretty predictable felters.
On a completely unrelated note... I found this at the grocery store the other day, and had to try it.
It kinda tastes like an ugly sweater too ;).
Wednesday, December 28, 2011
Cute & easy flowers
.
This could fall under both "Tutorial Tuesday" & "What I've Been Working on Wednesday", but since it's already Thursday, this might be best without a category ;).
I found this tutorial on a blog I stumbled across, Drab To Fab. The original tutorial uses fabric and hot glue, but I used lightly felted cashmere and felted wool, and hand stitched it in place as I went. The first one I made was this cashmere brooch for my mom:
I then made this wool one into a hair clip. I liked this one better without anything in the center. These were really easy and fast to make.
Here are the cloth ones from Drab To Fab's blog:
Cute, eh?
Thursday, December 22, 2011
Merry Christmas from Resweater!
Merry Christmas!
I hope you all find wonderful things under your trees!
My family & I will be slowing down, and enjoying the holidays for the next few days, so I will not be blogging again until Tuesday... yes, Sweater Monday will be on Tuesday again ;). Feel free to email me about any orders, or questions you have. I will just not be blogging. I hope you all have a wonderful Christmas!
Tuesday, December 20, 2011
It's Tutorial Tuesday! Make a poinsettia brooch
Got time for a last minute Christmas craft? This fabulous tutorial from Lisa at Lil Fish Studio's blog, would make a great gift, or just make one for yourself to wear to all those Christmas gatherings! To go to the tutorial, click here, and scroll down a little. Click on the picture of the brooch when you see it on the right side bar. While you're there, read the rest of her blog... Lisa is an amazing fiber artist!
Labels:
brooch,
Lil Fish Studios,
poinsettia,
tutorial,
Tutorial Tuesday
Wednesday, December 14, 2011
It's What I've Been Working on Wednesday!
I made this wool Christmas tree this week.
Just a decoration, right?
Well... actually it's a hat!
It looks better in real life, but the lighting was bad. I even made the hat band brown (can't really tell from the picture) for the tree trunk. I need to make some mini ornaments for it. I will be wearing it to my son's class party on Friday. I am SO glad he's not of the age where he is embarrassed by mom yet! ;)
Tuesday, December 13, 2011
It's Tutorial Tuesday! Make a cute coupon or tea bag wallet
Dena, over at Everything But The Oink, has come up with another great tutorial... a tea bag or coupon wallet! What a fun gift idea, and with her simple & easy to follow tutorial, you can make these in time for Christmas! For the full tutorial, just click here, to be magically transported to her blog!
Wednesday, December 7, 2011
It's What I've Been Working on Wednesday!
Saturday's show (which I will blog about next week) has kind of thrown my week off, so I apologize that there was no tutorial yesterday. I was still able to make a few things this week, mostly before my show.
When we have little ones over, I like to bring out my son's outgrown dolls for them to play with. The other day my son told me that they would have more fun with them, if they had more clothes, so I made these little pjs from an infant romper I bought at the thrift store. It was really easy, since I was using the existing hems on the neck, arms, legs, and the snaps of the romper.
I found a great lambswool/cashmere argyle, and used it to make my son some woolly pants, since he was outgrowing some of his. They are much cuter on, and the colors make my son look like a cute elf :).
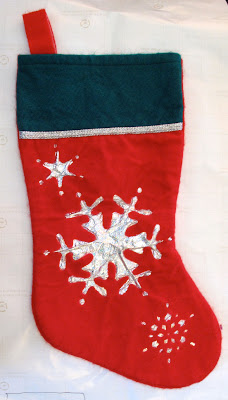
I made 2 more stockings, that I fully intended on selling at the craft show, but I wanted to have more of a selection, so I never brought them. They look wonky in the picture, but don't look so bad in real life.
That's about it! What have you been working on?
Friday, December 2, 2011
It's Feature Friday! Fibers and Twigs
Christmas is approaching fast! What better gifts to give than handmade ones, and made from recycled wool! At Fibers and Twigs Etsy shop, you can find patterns to great slippers, mittens, fingerless mittens, and more! While you're at it, make sure to check out Jan's blog, You Make it Simple, for more fun!
Thursday, December 1, 2011
Do you love your sewing machine?
As Christmas approaches, i've got visions of sewing machines dancing in my head! I would love to get a new sewing machine, but i'm overwhelmed with all the choices, and without being able to test them all, I don't know what would be best for felted wool. I have had others ask me lately too, so please help us out if you love your sewing machines! Let us know what make/models you have, if you love sewing with wool on your machine.
I adore my antique Singer Featherweight, but it is very slow, and only does one straight stitch. I will always love & use it, but I need an everyday machine.
The Babylock BL9 I bought last year just hated me. It would be working great, then it would eat my project out of nowhere. I tried everything, and just couldn't get any consistency out of it, and sold it.
I currently am using a Brother VX1100. Years ago they sold them at Walmart for under $100, so I don't expect much from it. It is a good machine, and it was a great garage sale find, but I would like something better. I have to help feed everything through unless it's a thinner material, so I would like something that handles the thickness of wool better. For now, at least it's predictable, it beats the Babylock!
The garage sale 60's Singer I bought didn't end up working, though they said it did :(. The repair guy said it would cost $200 to fix, and the machine wasn't worth it.
So, what do you use to sew your felted wool, and do you love it?
Wednesday, November 30, 2011
It's What I've Been Working on Wednesday!
After making stockings for my son, my husband, and I, I realized someone was missing.... our dog Spots! I made her a stocking too. When I showed it to her, she instantly got the zoomies (if you have ever had a dog or cat, you have probably witnessed the zoomies at one time or another). It almost seemed like she was excited about the stocking, and we laughed so hard :). No point to this story... it was just funny.
Monster knee patch? Pure genius. Not my idea, but I love it! I found it on Pinterest. Have you been on Pinerest?! It is addictive! It is a virtual bulletin board, to "pin" all those fun ideas you run across online. Anyhow, I found this idea here, and just happened to find a pair of my son's jeans with a hole in the knee, so there you go. The thing I did differently than the original tutorial, is that I seam ripped the side of the leg, so I could do the sewing with my machine. I figure the patch will survive more washings this way, and it only takes a few seconds with the seam ripper... much faster than hand sewing.
before & after:
If you have an older child, and this is too cute for them I posted a tutorial a while back on how to repair a hole with the "destroyed" look, here.
What have you been working on?
Tuesday, November 29, 2011
It's Tutorial Tuesday! Make a recycled wool stocking from scraps!
I have a confession. My family has been using store bought stockings until this year. Two from garage sales, and my son's stocking is from the dollar store. Isn't that horrible? This year I have decided to finally make ours, and here's a tutorial to boot!
First you will need a stocking to trace, to make a pattern, or just wing it... trust me... I have no artistic ability, and I can do it! You can also use Martha Stewart's stocking template, if you need a pattern. Now trace/draw & cut out 2 patterns.
Take the front pattern, and cut it into the pieces you would like.
Now use your pattern pieces to cut your felted wool pieces, remembering to leave a seam allowance (1/4"or 1/2" doesn't matter... whichever you prefer) at all the edges. Now sew your pieces together, remembering to keep right sides together.
Now take your uncut pattern, and cut out your piece for the back. You could also repeat the process of the pieced side, if you prefer the whole thing to be pieced.
Sew those 2 pieces together, right sides in, and don't sew the opening closed at the top!
Now for the top cuff, you can use a turtleneck, if you have one that's big enough & coordinates, or you can make the top from 2 rectangles sewn on each end. You will want the rectangles to be a little wider than the width of the top of the stocking, by about an inch.
Now to make a hanging loop for the stocking. Just take a strip of wool (mine was approximately 6" long, and 2 1/2" wide), and fold back a 1/2" on each side & sew it down. fold it over with the sewn edges touching. Now you have a loop.
Now, with your stocking still wrong sides out, place your cuff inside the stocking opening, so you can see the right side of the cuff when you look inside. Place the hanging loop upside down (cut edges up) at the back, by the side seam. Now sew these together, stretching lightly, and evenly, as you go. Since the cuff will be slightly bigger than the opening, you may need to stretch the stocking opening ends a little more than the cuff to even them out.
You don't have to, but to get a smoother stocking, you can now turn your stocking right sides out, pull the cuff up, and sew down that seam, so it's not so bulky. I used a zig-zag stitch, but a regular stitch will do the job too.
Now, if you haven't already, flip your stocking right side out & fold the cuff down. "Hey... that doesn't look right!" you are saying about now. Iron it! It is amazing what an iron can do ;). Now I have 3 great stockings for our family! Jack's is a little wonky looking, but that was because he wanted his bigger, and I tried to wing it without making a new pattern (I rushed through the ironing too). Silly me! I am not worried about it though... it will look perfect when it is stuffed with goodies! :)
Labels:
Christmas stocking,
diy,
Felted Wool,
how to,
stockings,
sweaters,
tutorial,
Tutorial Tuesday,
wool
Monday, November 28, 2011
Wreath ornament kits!
I am selling wreath ornament kits in my shop this year! Included in each kit is enough felted wool & cashmere squares to make at least 2 ornaments, plus 3 coordinating seams to make the hanging loops. They are only $5 a kit (makes 2 or more ornaments), and $2.50 for shipping (US). Shipping is free on any additional kits.
These ornaments make great gifts, and older children can make them.... the perfect thing to keep little hands busy over Christmas break! My son had just turned 4 when he started stringing these himself (I tie the knots). I recommend having them poke through the square into a pillow, if they are little, so they don't poke their fingers with the needle. Grownups love to make them too!
You can choose from Christmas colors (reds, greens, whites/creams), earthy colors (browns, greens, tans, creams, rusts), bright colors, mixed colors, or you can request special colors (but contact me first with special requests, so I can make sure I can fill them).
Want more information, or to buy some? Go here!
Subscribe to:
Posts (Atom)