

Many of my cloth diapering readers may have heard of reusable cloth menstrual pads, often referred to as "mama cloth", or "mama pads". Some of you are hearing about them for first time right now, and are saying "ewww!". That's ok, because that's exactly what I thought when I first heard of them ;). It has been about 4 years since I bought my first cloth pads, and have not used any disposable sanitary products since. They are much less expensive in the long run, even if you don't make them yourself, and they are way more comfortable than disposable products. They may even reduce cramping. I thought it was a bunch of nonsense the first time I read that they can reduce cramps, but I absolutely have had less cramping since I started using cloth pads. It could be a coincidence, but I am not willing to go back to disposables, just to find out!
Ok, enough of the introduction to cloth pads, and on to the tutorial! I decided to create a system, using a recycled wool base, rather than individual pads with backings. I figured it would be much easier to launder them, if the wool was separate from the pads, and the wool won't need to be laundered as often as the pads. Your first step is to cut out the wool back. Using a piece of very felted (you don't want it too stretchy) thin recycled wool (merino is probably best for this project), cut out this shape, making the length a comfortable length for you, for your pads (mine is 8" long):

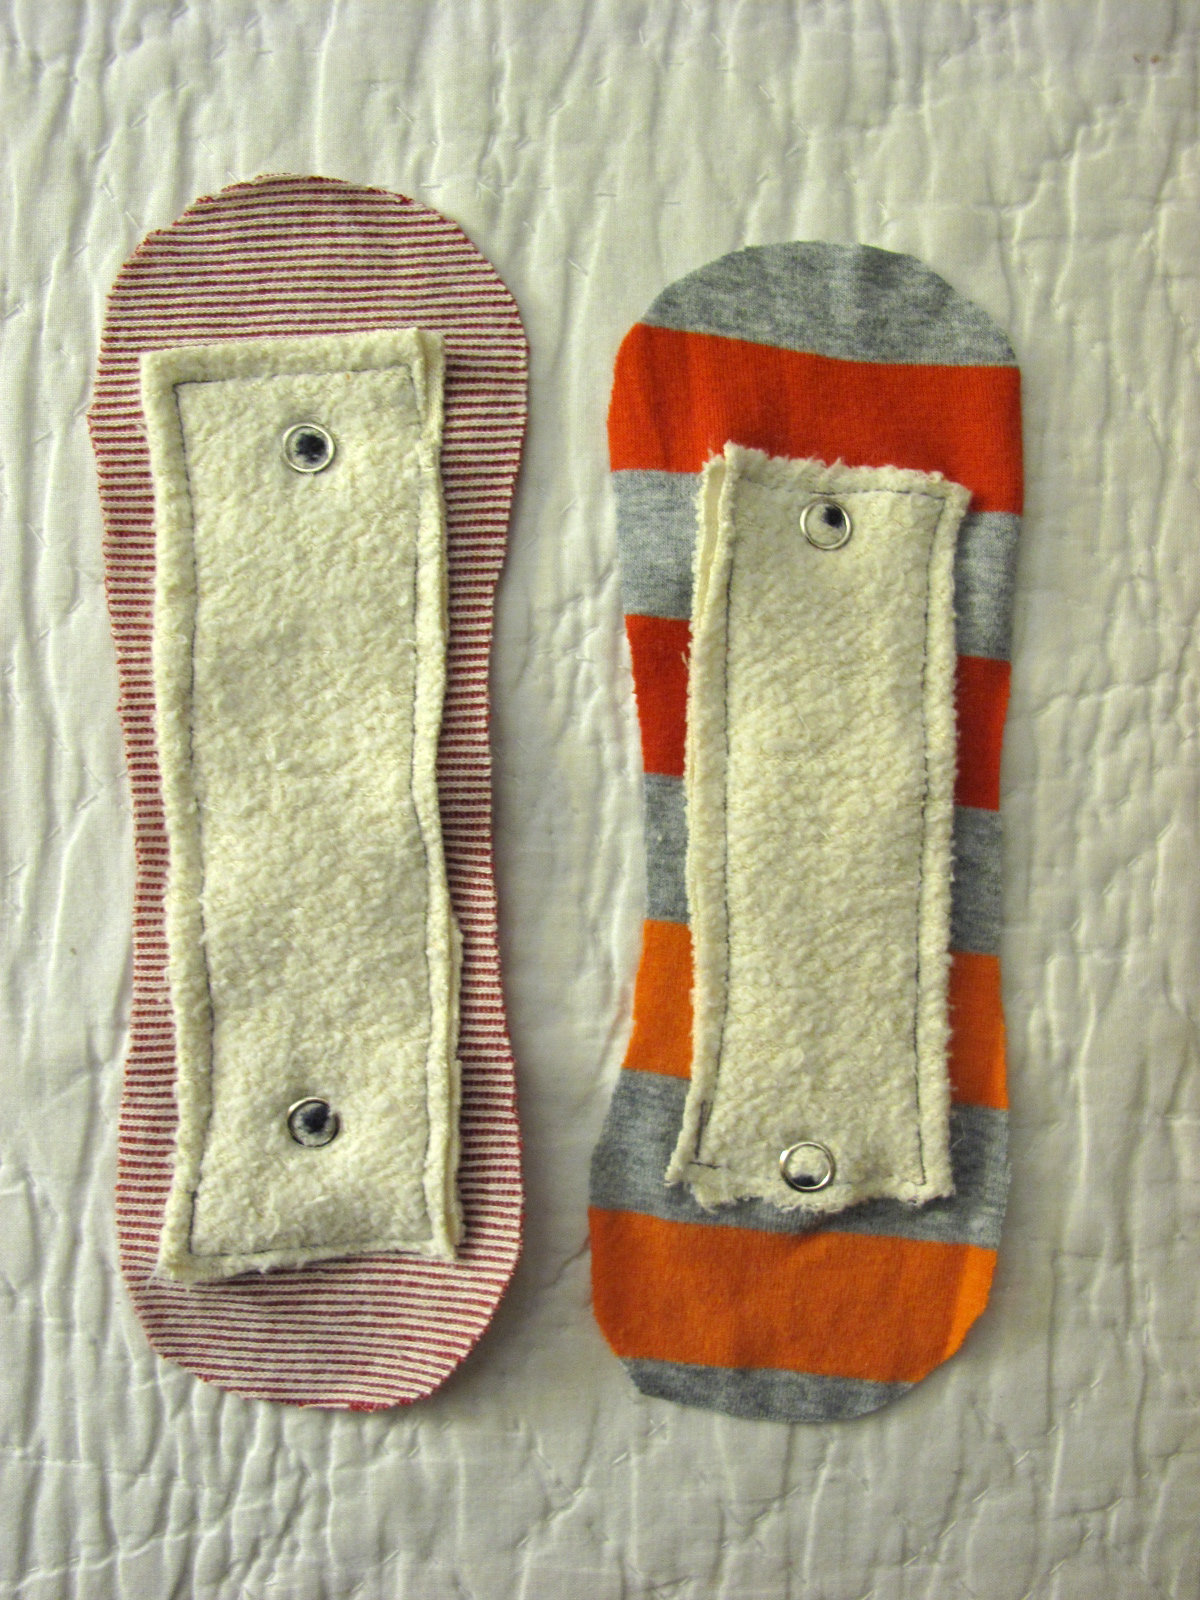
You'll want to add a snap to the wings, like the picture above, then add 2 snaps in the center, like in the picture below.

This was my first time ever using snaps. I don't know why I was so intimidated by them until now. It is so easy! I have had bought the snaps and snap pliers, below, at a garage sale a long time ago, and couldn't tell how to use it by looking at it. I Googled around, and this website had very clear & simple instructions.

Ok, now you are ready to make the snap on pads. You will want to make a template for your pads. You will want to make your template slightly longer than the length of your wool base, so after your seam allowance, they will be the same length as the wool base. I free hand drew my template, but you can use your favorite shaped disposable pad as a template, and there are some great templates on this site, as well as more cloth pad tutorials there. For your material, you will want to use very absorbent materials, so no wool! I have tried all the different fabrics, like bamboo velour, raw silk, and minky, but always come back to cotton & cotton flannel. The choice is up to you, but I strongly recommend a non stretchy, woven fabric. You'll see why further into this tutorial. I used scrap fabric I had on hand for all that I made. This is a great project for using up scraps! Now that you have your template, but out your pieces, 2 for each pad.

You will now cut some scraps for the middle, for absorbency. You will want to leave room for the seam allowance on the sides of the absorbent middle. You will need to determine how many layers (how much absorbency) you will need for each pad, and sew half of the layers to each side. If you do not have enough layers for both sides, just sew them to the side that will be the underside of the pad. The snaps need more than one layer to go through to stay on firmly. I may or may not know this through experience ;). I like to sew a line through the center of the tops to create a "channel", as well. My absorbent layers are not uniform sizes, because I was just using up some scraps I had on hand.

Now you are going to add the snaps to the bottom of your pad, making sure the connecting end of the snap is on the outside, either the male or female part... the opposite of whatever is on the wool base. To make sure the snaps were going to line up, I lined up the pad on the wool backing and pressed down where the snaps were on the wool, and it left little indents in the pad. I then used a marker to put a dot on the indents, to mark where the snaps would go.
Now you can sew your top & bottom together, right sides in, leaving about a 2" opening at one end.

now flip them right side out through your opening. Tuck the cut edges in, and sew it closed, then sew all the way around the edges.


Hmmm.... that doesn't look right. Maybe they just need a little ironing...

Nope. They still look weird and misshapen. This is why we don't use stretchy knits for this project. I don't know what I was thinking. Can you believe these came from the same template? Even though they are ugly, they are still usable, so it's ok. If you used a woven fabric, like I originally should have, they should end up looking like this:

Much better, eh?
Now you can make several pads, and snap on a fresh one whenever it's needed.

I recommend making 2 wool backings, and alternate them, so one can air out while the other is in use. Why a wool backing with cloth menstrual pads, instead of using disposable pads? ...
- Wool is moisture resistant, while remaining breathable. The plastic layer in disposable pads is definitely not breathable! If you add lanolin to the wool it will be nearly waterproof.
- Wool has antibacterial properties, and naturally kills bacteria that causes odors. Disposables can add perfumes in an attempt to mask odors, but wool really helps to remove them!
- Wool can be used again and again, before even needing to be washed. Even if your wool backing & pads doesn't last a lifetime, wool & cotton are ultimately biodegradable. Disposables need to be thrown away after each use. This gets expensive, and is not good for the environment.
- Wool is convenient. If you use reusable pads, you will not run out of them, and never have to make trip to the store. They are always there, once you make them.
What you use, or don't use, is entirely up to you, and is a personal choice, but now you have another option.
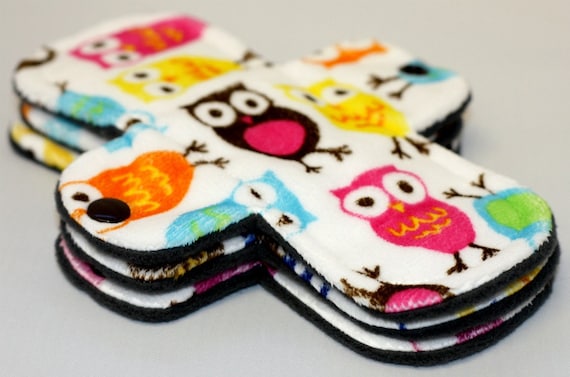
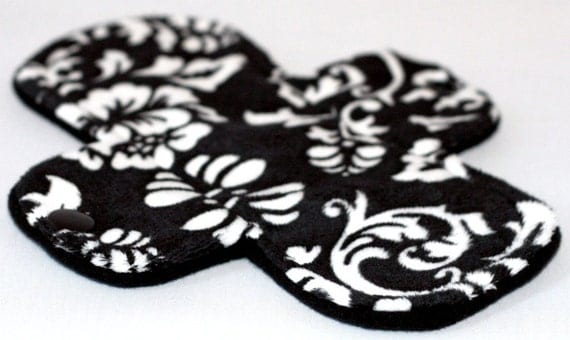
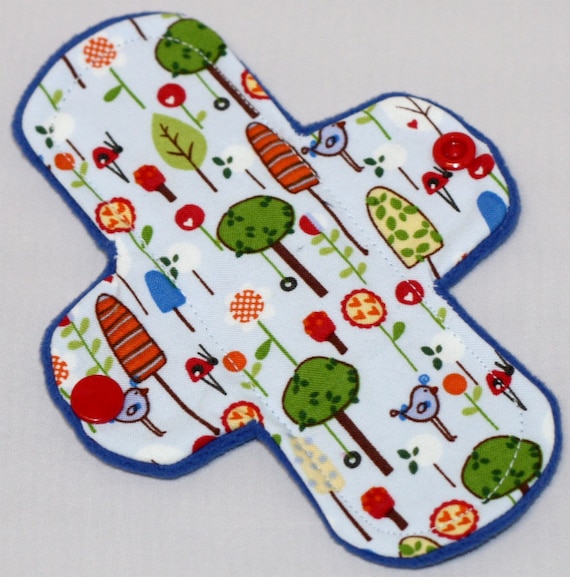
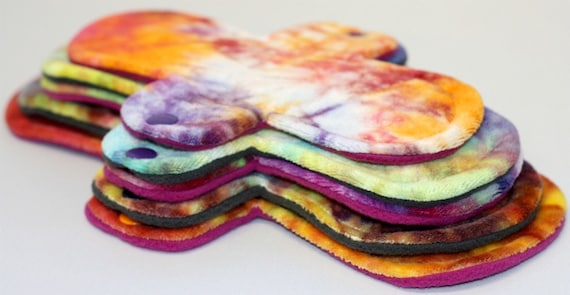
In the beginning, I bought a bunch of different pads, from different makers, in different sizes, shapes, materials, and thicknesses. I discovered I liked Pink Lemonade's pads the best, so if this tutorial is a bit beyond your sewing abilities (I wouldn't have even attempted this myself a year ago), but you want to try cloth pads, I highly recommend Sue's pads. Pictures of pads from her Etsy shop:

26 comments:
I wouldn't have considered using wool for cloth pads. I would think it could cause a sweaty crotch! But maybe not? I actually use Party in my Pants pads. they are more expense than some other brands, but I LOVE them! (They are one piece and very thin for their absorbancy levels!) I like your tutorial, though. I might have to try it out!
Actually, wool will prevent a sweaty crotch! Wool wicks away moisture and helps it to evaporate faster, while plastic holds it in. I love the name of your pads! It made me lol :).
This has been on my "to do" list for a very long time. I hadn't thought of using wool either. All patterns I've seen call for some kind of plastic-y material, so I haven't jumped in. Fun tutorial!
I have been interested in these for a long time and would like to make some but I'm very curious about the cleaning/laundering process. I'd love to hear from anyone who uses them on how they handle this. :)
I don't care about staining, so I just throw them in the laundry [dry], and when I am done with my cycle I wash them at once. An hour before i'm ready to wash them, I throw them all in a bucket and soak them in cold water. I wring them out, rinse them again, then throw them in with a wash load (usually underwear & socks). That is just how I have done it, and have no issues ever with smell or anything, and I have used the same ones for years now. I am sure there are different ways of laundering them that is just as good. I recommend Googling some of the popular makers, and seeing what they recommend for laundering.
I have been using cloth pads for years and have wanted to make my own, and now I know how. Thank you! Helen
Thank you for the tutorial!
I made some cloth pads a few months ago but didn't really sew them right (I was rushing and didn't turn the corners or serge) and now they're falling apart. I need to get busy and make some new ones before AF comes again.
So I found a big old felted wool blanket and a full size red cotton flannel sheet at the local thrift store for about $6 all together. I was looking for a pattern that was something like this, where you could remove the inserts to keep the wool backing separate and easier to clean. Do the snaps encourage leaks around that area though? I imagine they would weaken the fabric at that spot.
I thought of putting straps at the top and bottom of the backing to hold the inserts - kind of like LunaPads.
Ags was wondering about the laundering process - I keep a ceramic cookie jar next to the toilet and fill it half way with water and add about a 1/4 cup baking soda. I put all the dirty pads in there for the duration of my period to soak and at the end of the week just toss the whole thing - water and all - in the washing machine. If I change the pads every few hours and put them straight in the cookie jar, there aren't any stains after washing. :)
This is great! I have been searching for a tutorial like this for a long time. I like the idea of using wool and I love the idea of being able to change out the pads as needed. I don't care as much for the one piece designs.
I think this is great... but when you are out and about and need to change, where do you put the soiled one? Does anyone have any ideas on a type of sashe that wouldn't retain odor or be obvious?
I use a small cosmetic bag, made from a leak proof fabric to store used pads in while out n about.
This is a post from a long time ago, but on the off chance you're still responding to comments....
I recently made one of these (thanks for the instructions!) and LOVE it... in theory! However, in practice the top layer bunches up and the whole thing becomes very uncomfortable! Do you not have this problem???
RinaMarie, I make my own pads too with recycled sweater, but like you I found, that if back is separate, they bunch a lot. So I made all in one pad with back made from recycled wool or cashmere (I usually use bamboo cotton velour on top and bamboo/cotton fleece in the middle for soft and trim absorbent pad).I do prewash my sweater material as well as others 2 or 3 times on hot, so they would shrink as much as they will to avoid shrinking surprises. I also decided to use buttons instead of snaps for several reasons - they hold up much better in the dryer, they are easy to replace or sew into other place, if needed, and there are so many color choices. Make sure button is flat, and it is not bothersome at all.
Thank you for this post, and for the pattern with instructions! Very easy to follow. I'm a little bit confused about the wool absorbency statements, though, as I decide which materials to use. Wool has the most absorbent fibers of all fabrics. Wool fabrics can absorb up to 30% of their weight without feeling heavy or damp, for example, while cotton fabrics can feel damp after 15% (sometimes less) of their weight gets wet. This is just one reason why parent friends of mine LOVE wool teething bibs and cloth diaper outers/covers. I will most likely try a few wool-only, cotton-only and wool-and-cotton combinations to test things out, but am just curious about additional data on absorbency. Everything I can find says wool is more absorbent than cotton.
I don't know why I never see this anywhere, but as far as cleaning cloth pads, I find all that water bucket stuff nasty and unnecessary (especially since I share a bathroom with 3 curious young boys). I've been using cloth for several years now and I keep a wet bag hanging on the door under the sink, throw them in dry. Then at the end of my cycle, I turn the bag inside out in the washing machine (front load), run a prewash cycle with vinegar, then add other laundry and wash as usual. Sometimes between the prewash and adding other laundry, I'll spray a little stain remover on them if necessary. Truly no fuss, no mess. Haven't used wool yet, but intending on making some very soon.
I'm way passed using such things for menstrual cycle, but I'm now in the bladder-uncontrol phase of life. I'm wondering how this pattern might work for such things. Disposable pads for leakage are about 30¢ per pad, so that can add up to maybe $150 per year or more.
Plus, I constantly worry -- if I ever ran out of pads & could not replace them for any (frightening) reason, what would I do?
But it's hard to imagine making a cloth one that would absorb, for example, a sudden flow of urine when coughing, sneezing, shopping!
Still, something would be better than nothing if I did not have the disposables!
Any ideas for building a mini-mattress for for the old bladder-faucet crowd?
I'd love to hear more about your blogs. Keep it up!
Hygiene Services
http://impacthygiene.com.au/
Did you try the different combinations? I was curious about the same thing, as I have used wool diaper covers many times!
I want to make inserts for my cloth diapers, I'm more of a bamboo fan, but if I were to use bamboo and wool together (either for over nights or a doubler), should the wool go on top of the bamboo or on bottom.
If on bottom, should I make the wool thicker (like a soaker) ?
It's been hard to find this specific answer.
I guess the answer to that is like this. They both are absorbent, but which one is less likely to soak through and leak?that's the one you want underneath. I personally use a material called PUL (polyurethane laminate) on the bottom of all my pads to make them completely leak proof. And trust me, I've had gushers that leaked off the sides of the pad but never leaked through the bottom at all. That material works wonderfully
Hi, thanks for this! Really helpful. I’m exploring different options and planning to try out a few different designs. If you’re feeling generous with your time and upcycled pads, maybe have a look at my blog post “Aunty Flo’s Rag Time Band” on lookingoutforbob.wordpress.com. Thank again!
When you get out of the water your period will flow again normally, so it's a good idea to use a tampon or menstrual cup while swimming. Pads and pantyliners aren't a good option because they will absorb water and become ineffective.21-Jun-2017
buy Essentials sanitary pads
Thank you for sharing your knowledge and inspiring others to consider alternative ways to create and repurpose. Your blog post has motivated me to explore upcycling projects and embrace a more sustainable lifestyle.
https://www.aintpayingfull.com/promotions/children's-place-coupon-code-$10-off-$40
Your tutorial on making upcycled mittens from old sweaters was both practical and resourceful. The idea of repurposing materials to create something new and useful is not only cost-effective but also environmentally friendly.
https://www.frugalishness.com/50000-a-year-is-how-much-an-hour/
A balanced diet and most comfortable sanitary pads plays a vital role in managing stress during menstruation. Incorporate nutrient-rich foods into your meals, including fruits, vegetables, whole grains, lean proteins, and healthy fats. Avoid or minimize the consumption of caffeine, sugary foods, and processed snacks, as they can exacerbate stress and mood swings.
Do you have details on making an all in one. My daughter wants these for liners and I want to make what works great. I want to try this pattern as well
I'm doing that phaze myself. I like the removable/replacement pads for light leaks. For overnight though, I can quickly need a lot more absorbency. And a longer catch zone. Fluid tends to follow physical body contours. So I incorporated a slight padding berm on the back side along with length. Lots of flannel or linen layers (linen is a lot like wool in some properties ). I want to try the wool though.
Post a Comment